 Mailwynx
Documentation
Everything you need, one migration at a time.
Mailwynx is a point-and-click app you run on your own machine — download it, double-click, and work in your browser. This guide starts with download & activation, shows you how a migration runs in the app, then gives a complete, self-contained checklist for each migration direction: what you need and every step. Jump to yours below. Prefer the command line? It's at the end.
1 · Download, install & activate
Mailwynx runs on your own Windows machine and opens in your web browser — there's nothing to code and nothing to expose to the internet. Get it from the download page, then follow the two steps below.
- Download
Mailwynx.exefrom the download page. It bundles everything — no Python, nothing to install. - Double-click
Mailwynx.exe. A black window opens — that's Mailwynx running. On first launch Windows may show a SmartScreen notice (the app isn't code-signed yet): click More info → Run anyway.
Your browser opens automatically to the Mailwynx app at http://127.0.0.1:8770. If it doesn't pop up on its own, open your browser and type that address in.
The very first time you open it, Mailwynx asks you to set a master password. This password encrypts every credential you save, right on your machine — pick something strong and keep it safe, because there's no way to recover it. After that, one password unlocks all your migration projects. Everything stays on your computer: there's no Mailwynx cloud and no relay server.
Sign up & activate your license
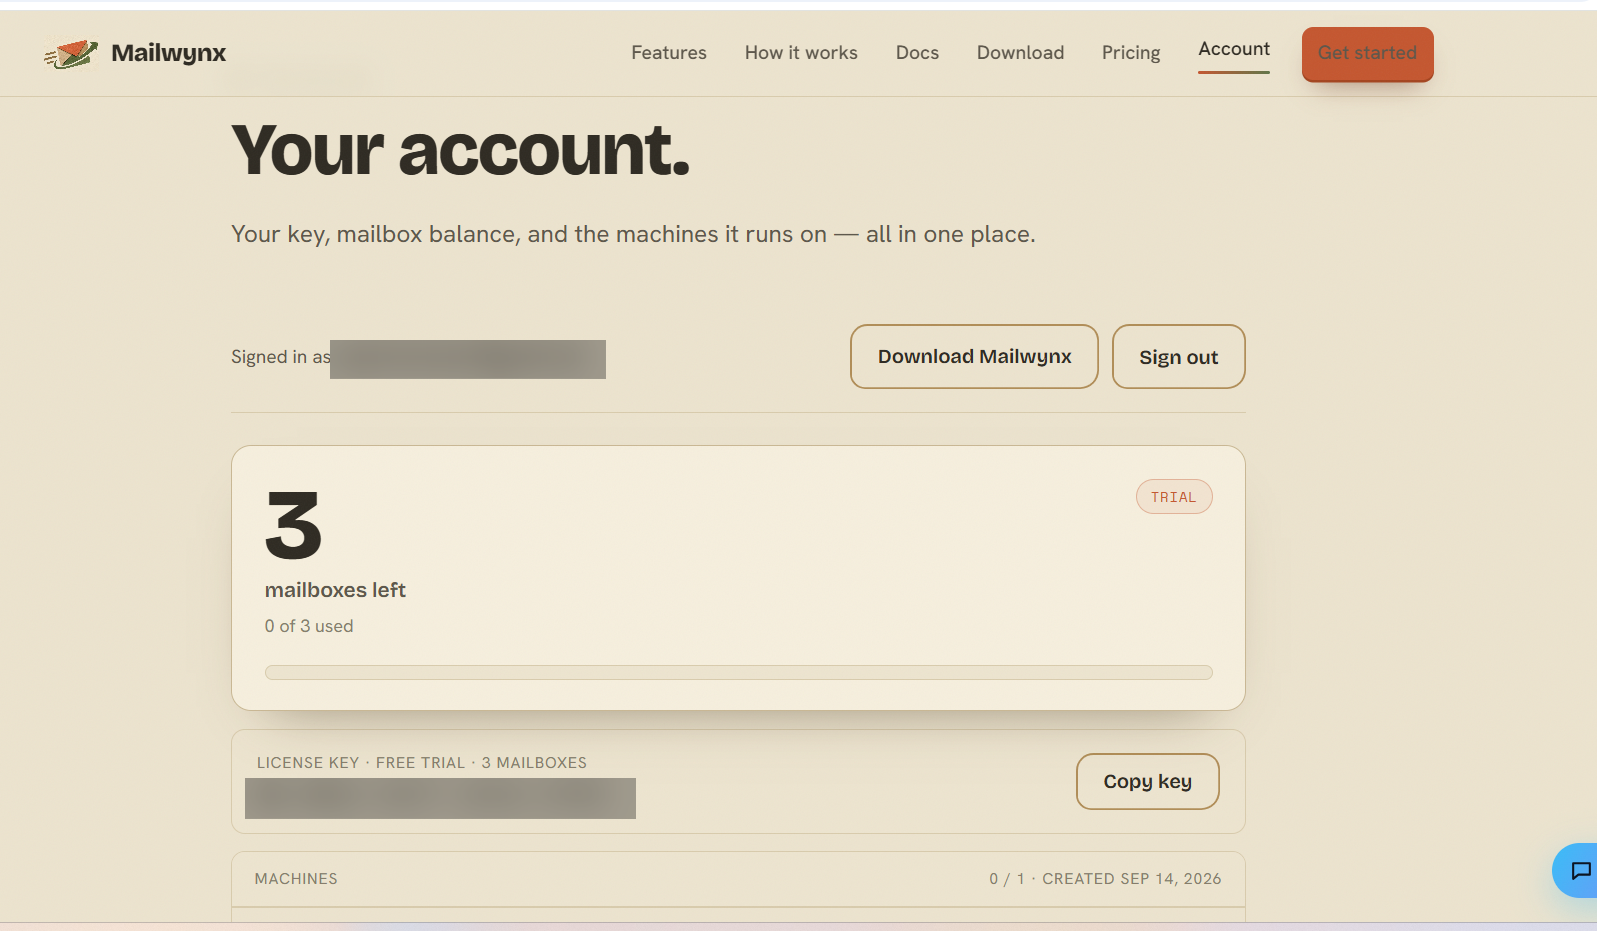
Mailwynx is free to explore: Verify and Pre-stage (dry run) never need a license and never move mail, so you can build and rehearse a whole project first. To run a real migration, you activate this machine once with a license key — and every new account includes 3 free mailboxes.
- Create your account. Sign up at mailwynx.com/signup — a trial license key is issued instantly, no card. Your key and how many of the 3 free mailboxes you've used always show on your account dashboard.
- Copy your key. It looks like
MW-XXXXX-XXXXX-XXXXX-XXXXX. - Activate this machine. Open the folder that holds
Mailwynx.exeand run it once with your key. This is a one-time setup step — everything else stays point-and-click in the browser:
> Mailwynx.exe activate MW-XXXXX-XXXXX-XXXXX-XXXXX
✓ Activated. Licensed — trial plan, 0/3 free mailboxes used.

Mailwynx.exe — the green line confirms the machine is licensed and how many free mailboxes remain.Check your license on this machine anytime with Mailwynx.exe license. That's it — switch back to the browser and the Migrate button is unlocked.
Mailwynx.exe. No server, no admin rights, no open ports. Mac and Linux users can run Mailwynx from source — see section 8.2 · How a migration runs in the app
Every migration — whatever the direction — follows the same five steps in the browser. The direction guides below only change what you enter on each side; the flow never changes. It helps to see it once here.
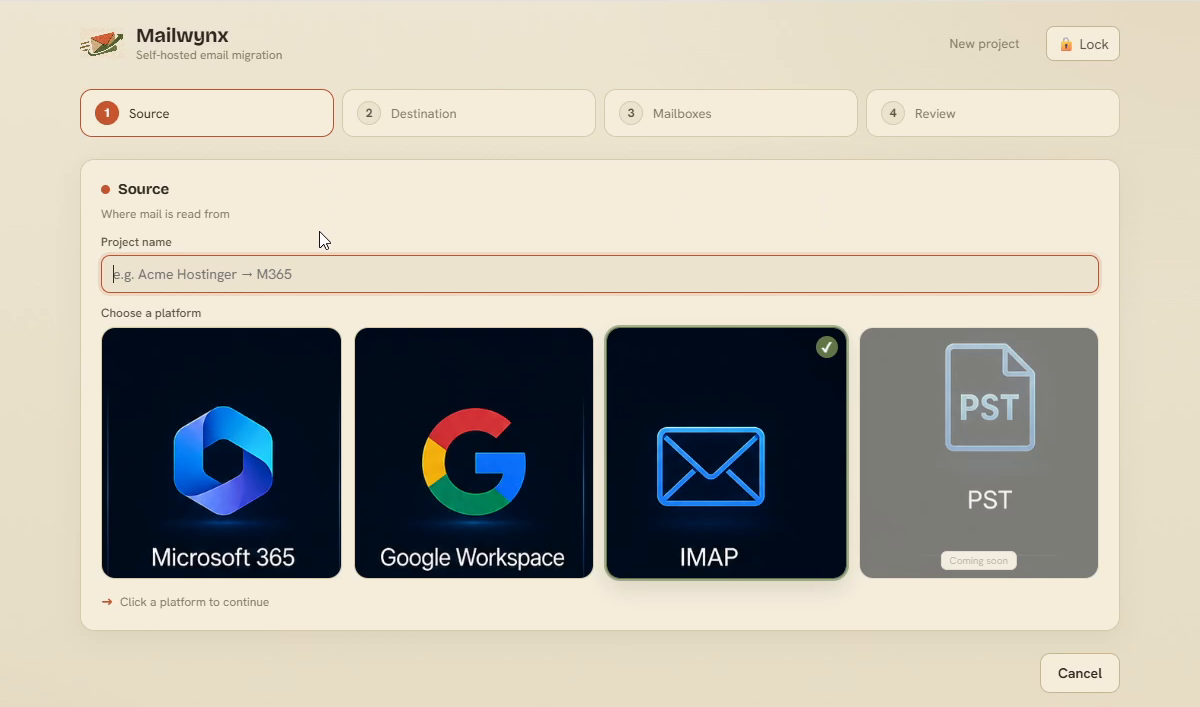
a. Create a project and choose the source
Click New project, give it a name, then click the tile for where mail is coming from — Microsoft 365, Google Workspace, or a generic IMAP host.
b. Map the mailboxes
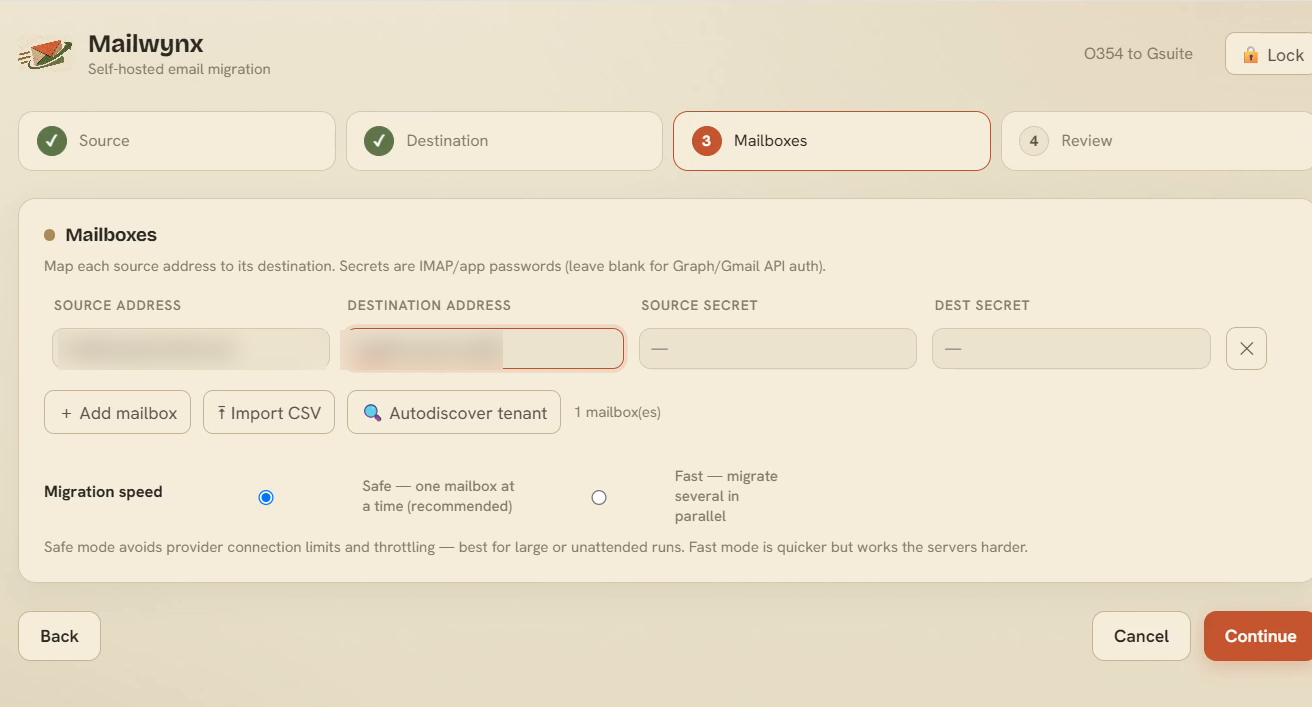
Tell Mailwynx which mailbox goes where. Type the pairs in, Import CSV, or — for a whole Microsoft 365 tenant — click Autodiscover tenant to pull the list automatically. Leave the secret boxes blank when a side uses API access (Microsoft 365 or Google); fill them with app passwords for IMAP. You can download a sample CSV to start from. Choose Safe (one mailbox at a time — best for big or overnight runs) or Fast (several in parallel).
c. Verify, pre-stage, then migrate
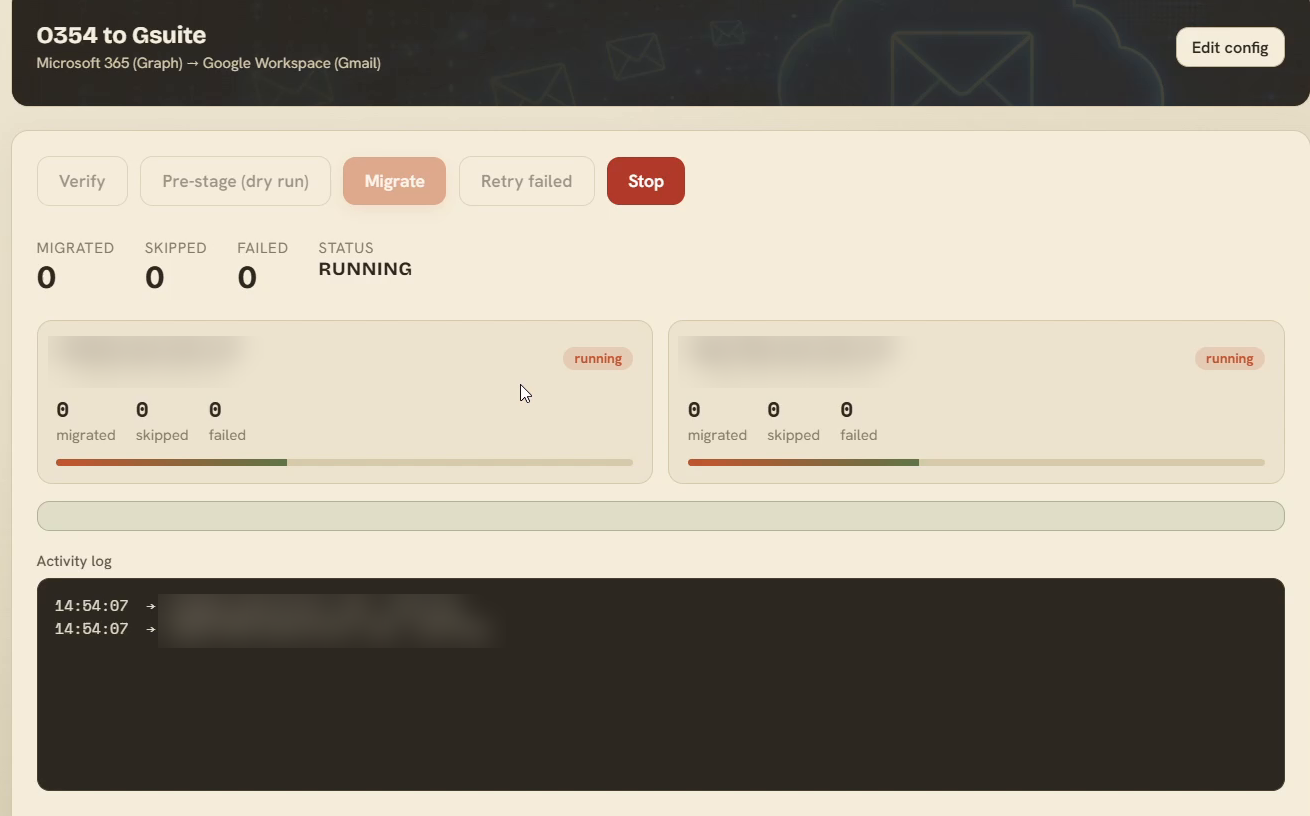
On the project dashboard, click Verify to test every credential and list the folders on each side — nothing is copied. Pre-stage (dry run) then counts exactly what would move. When you're happy, click Migrate: each mailbox gets a live card with migrated / skipped / failed counts and a running activity log. Mailwynx throttles itself under the provider's limits, and you can stop and resume any time — it picks up where it left off and never copies a message twice.
3 · IMAP → Microsoft 365
Moving mailboxes off a shared/IMAP host (Hostinger, cPanel, Zoho, Dovecot…) into Microsoft 365. This section also holds the full Microsoft 365 app registration — the later guides reuse it.
Moves: mail only · calendar & contacts are handled once by export/import (see the note at the end)
What you need
- From the IMAP host — the IMAP server & port (e.g.
imap.hostinger.com : 993, SSL on) and one app password per mailbox. A normal login password fails whenever 2-factor is on, so generate an app password in the host's webmail/security settings. - On Microsoft 365 (destination) — three values from a one-time Azure app registration: Tenant ID, Client ID, and a Client-secret value. You need a Global Administrator to grant consent once.
Part A — Register the Microsoft 365 app one-time · ~15 min
Mailwynx uses app-only (client-credentials) access over Microsoft Graph — no user sign-in, no redirect URI, nothing publicly reachable.
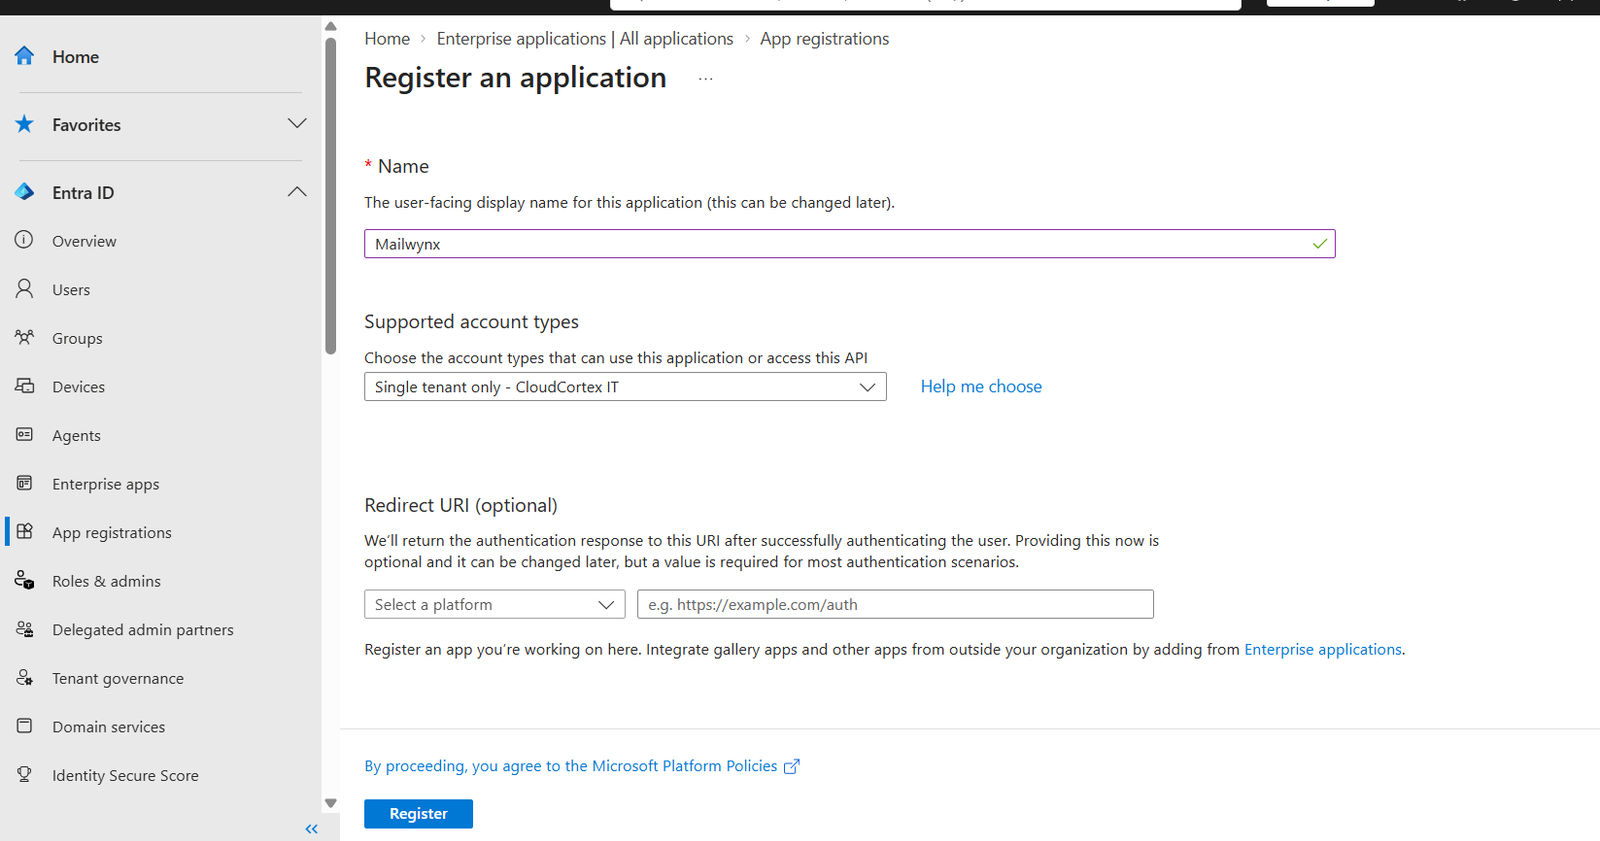
- Register the app. In the Microsoft Entra admin center → Identity → Applications → App registrations → New registration. Name it
Mailwynx, choose Single tenant, leave the Redirect URI blank, and Register.
- Copy the two IDs. On the app's Overview page, copy the Application (client) ID → your Client ID, and the Directory (tenant) ID → your Tenant ID.
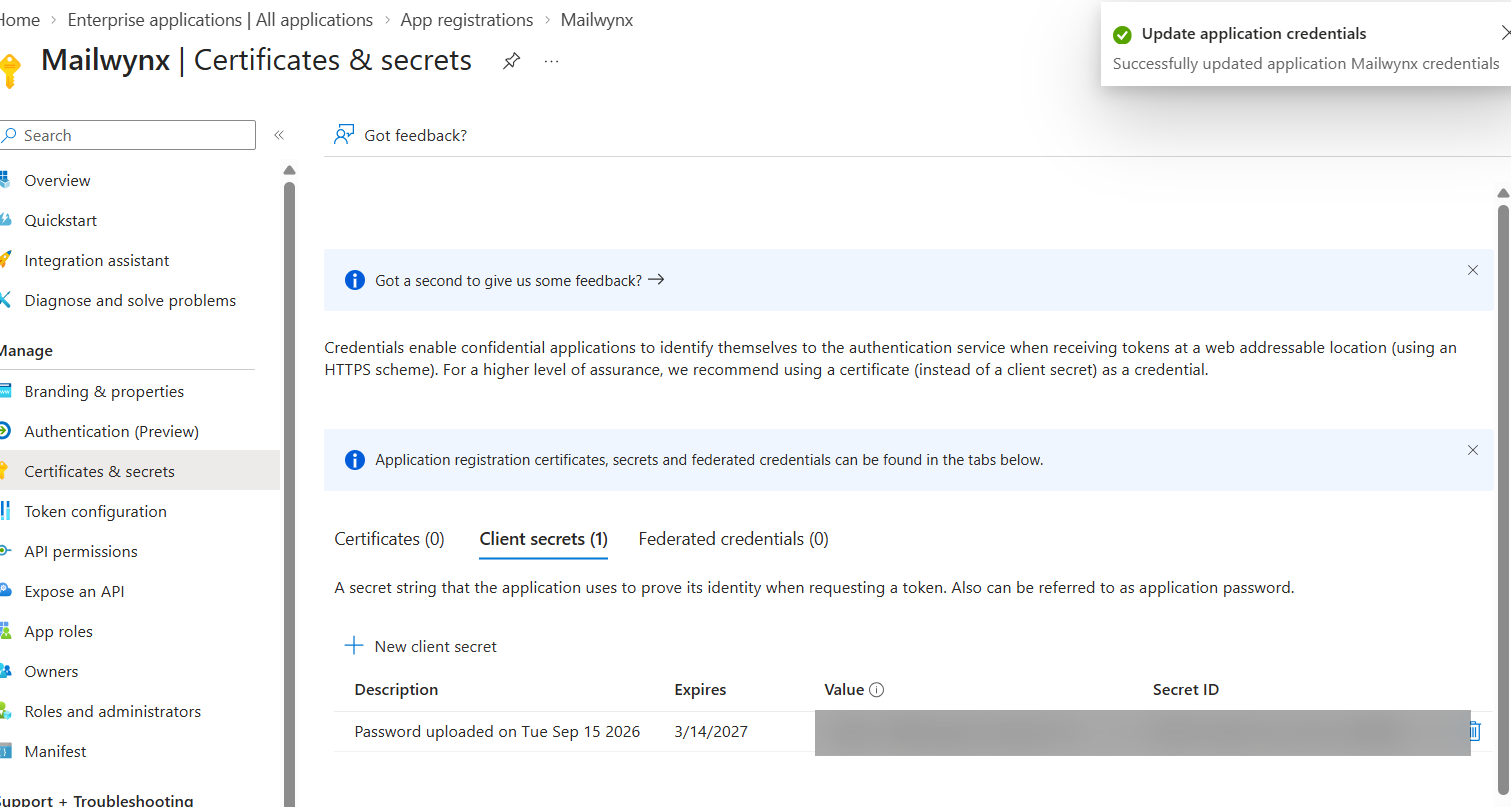
- Create a client secret. Certificates & secrets → Client secrets → New client secret (24-month expiry). Immediately copy the Value — it's shown only once. The Secret ID is not what you need.
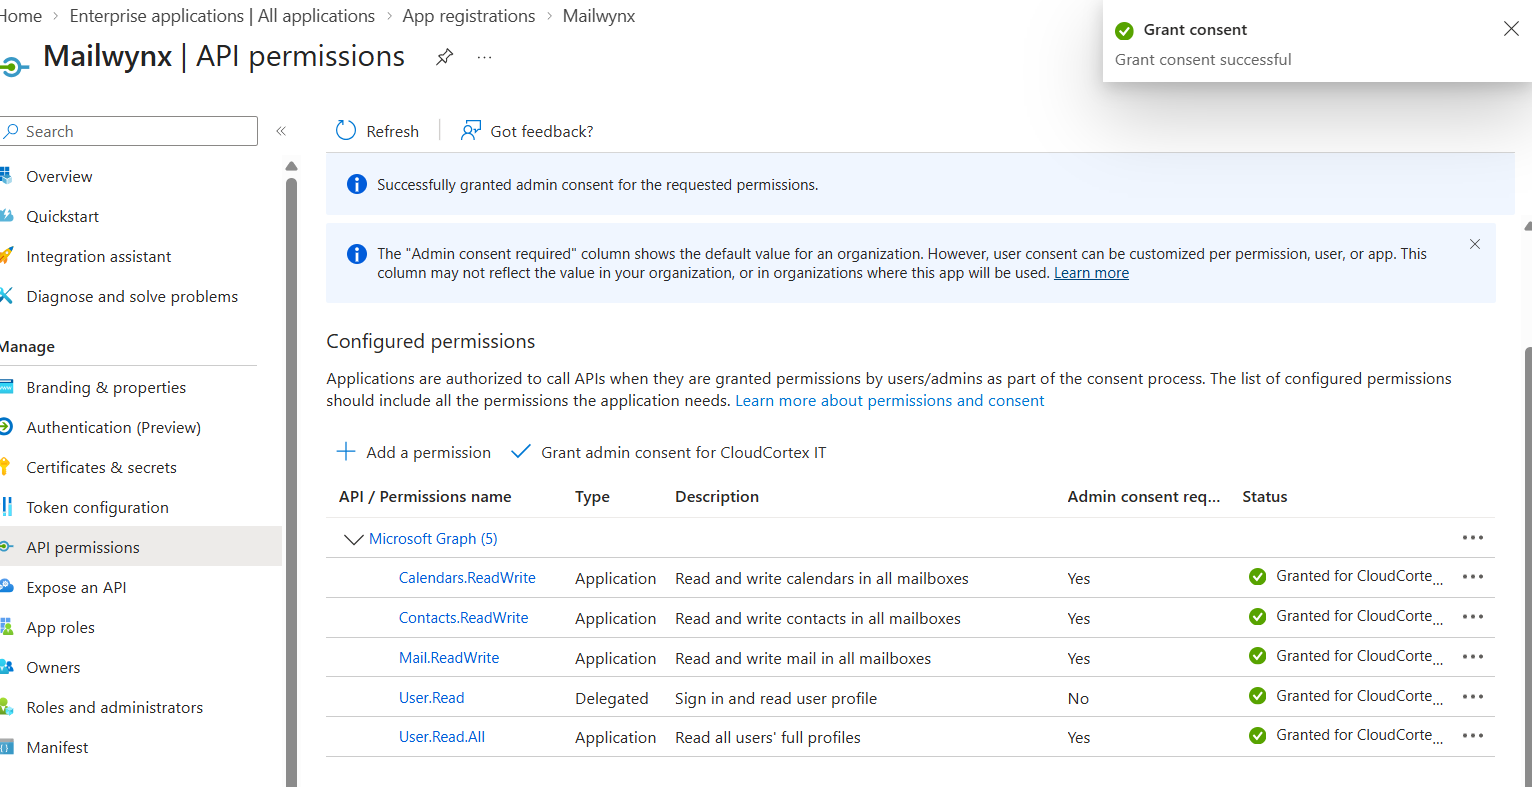
- Add application permissions. API permissions → Add a permission → Microsoft Graph → Application permissions, then add
Mail.ReadWrite,Calendars.ReadWrite,Contacts.ReadWriteandUser.Read.All. - Grant admin consent. Click Grant admin consent for <tenant> and confirm every row shows a green Granted check.
New-ApplicationAccessPolicy in Exchange Online PowerShell, so it can't reach anything else.Part B — Run it in the app
- New project → source IMAP. Enter the host and port (e.g.
imap.hostinger.com : 993, SSL on). - Destination Microsoft 365 — paste the Tenant ID, Client ID and secret Value from Part A.
- Map the mailboxes. Put each mailbox's app password in the source-secret column; leave the destination secret blank (M365 uses API access).
- Verify → Pre-stage (dry run) → Migrate.
4 · Microsoft 365 → Microsoft 365 tenant-to-tenant
Consolidating or splitting tenants — for example after a merger or a rebrand. Both sides use the same Graph app registration you set up in section 3.
Moves: mail · calendar · contacts
What you need
- A Graph app registration on the source tenant → its own Tenant ID, Client ID, secret Value.
- A Graph app registration on the destination tenant → a second Tenant ID, Client ID, secret Value.
- A Global Administrator on each tenant to grant consent.
Steps
- Register the app on the source tenant. Follow Part A of section 3 signed in to the source tenant — same four permissions. This gives you trio A.
- Register the app on the destination tenant. Repeat the exact same steps signed in to the destination tenant. This gives you trio B.
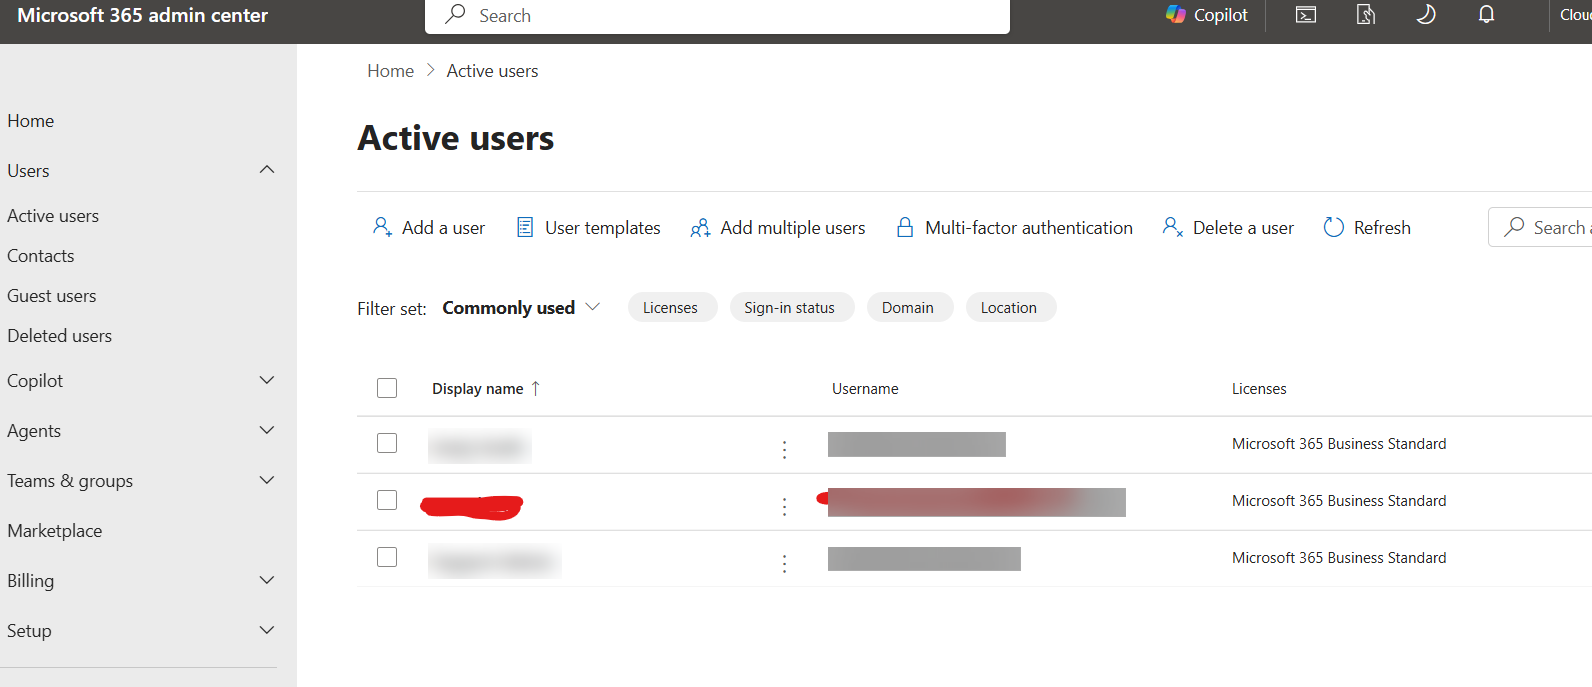
- Run it. New project → source Microsoft 365 (trio A) → destination Microsoft 365 (trio B). On the mailboxes step, click Autodiscover tenant to pull the source list, then map each old address to its new one — domains usually differ across tenants (
anna@old.com → anna@new.com), so a CSV is easiest. Then Verify → Pre-stage → Migrate.
5 · Google Workspace → Microsoft 365
Leaving Google for Microsoft 365. The destination is the same Graph app from section 3; the source is a Google service account with domain-wide delegation, so Mailwynx can read any mailbox over the Gmail API without per-user passwords.
Moves: mail · calendar · contacts
What you need
- From Google (source) — a service account with a JSON key, domain-wide delegation authorized for the three scopes, and the Gmail, Calendar & People APIs enabled on the project. A Google super admin authorizes the delegation.
- On Microsoft 365 (destination) — the Tenant ID, Client ID, secret Value from the app registration in section 3, Part A.
Part A — Create the Google service account one-time
- Create a service account in the Google Cloud console (IAM & Admin → Service Accounts → Create service account). Name it
Mailwynx.
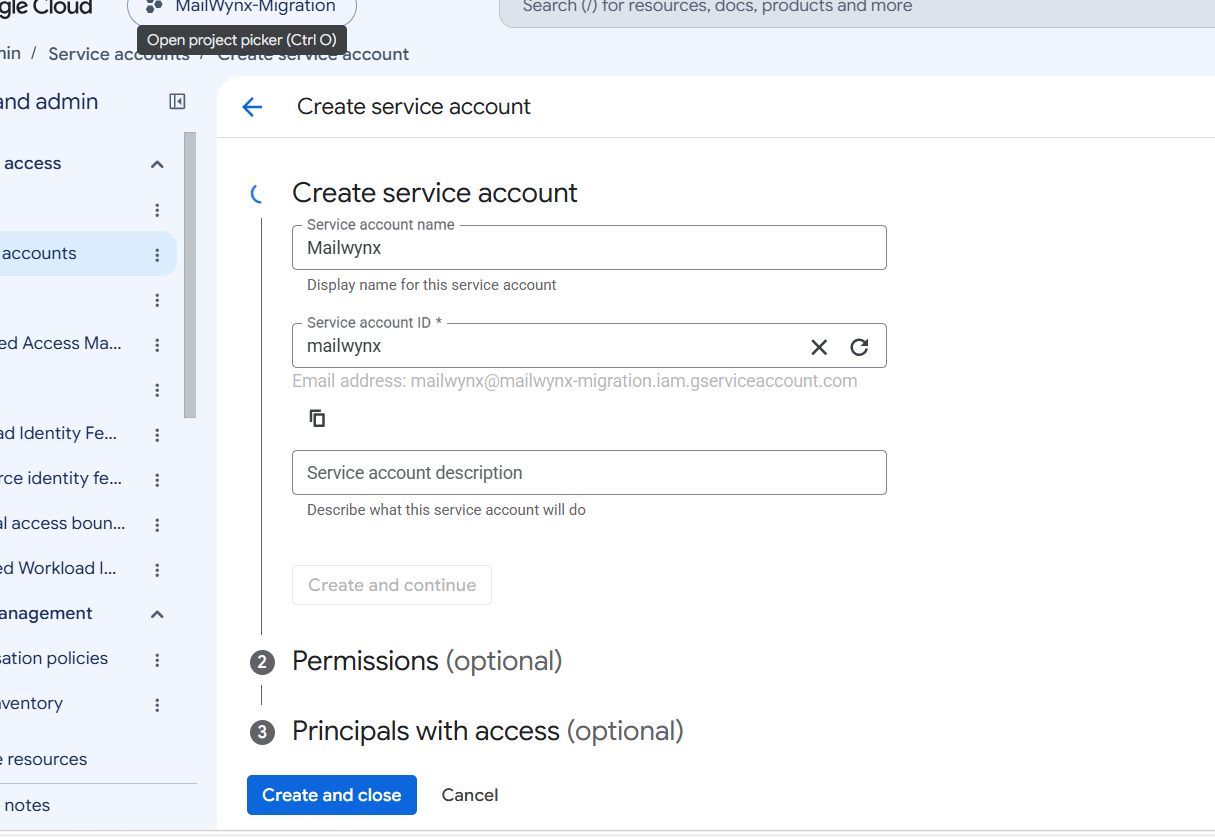
- Download a JSON key. Open the service account → Keys tab → Add key → Create new key → JSON. Save the file somewhere Mailwynx can read it.
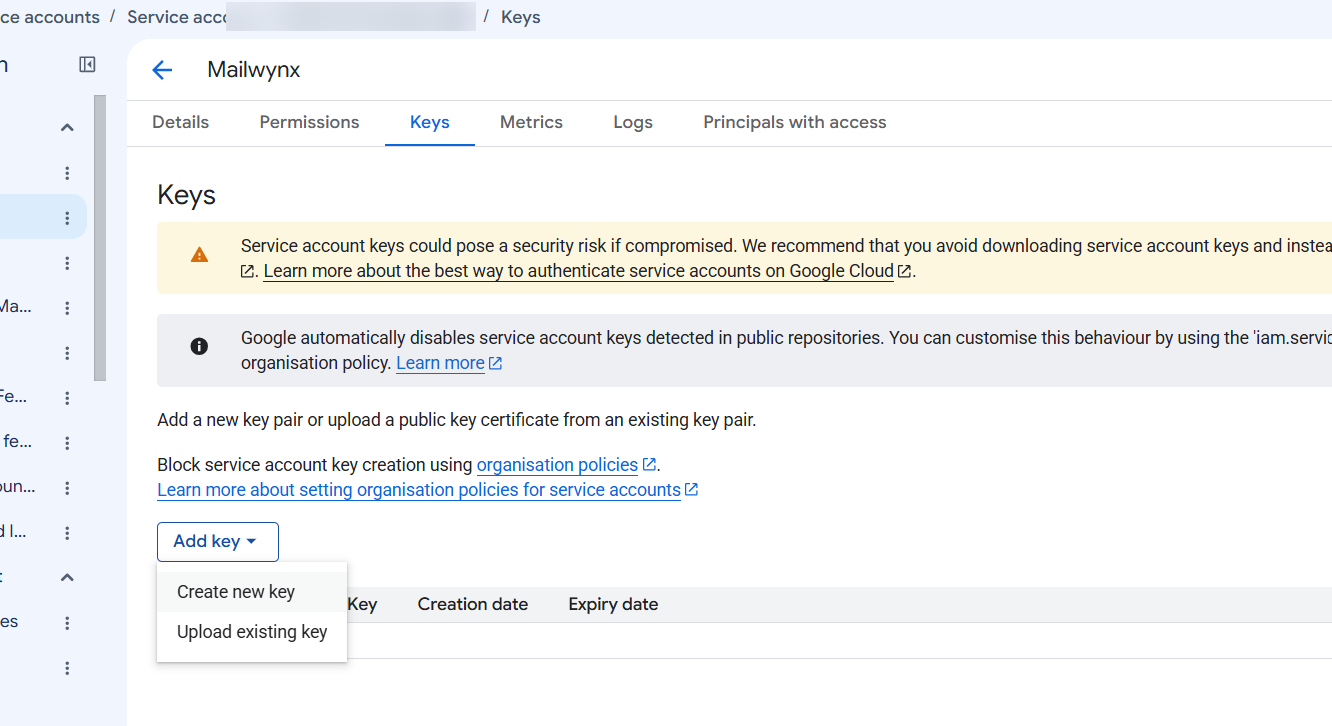
iam.managed.disableServiceAccountKeyCreation → Manage policy → Override parent's policy → Add rule → Enforcement Off → Set policy. Then create the key.- Enable the APIs. On the same project, enable the Gmail API, Calendar API and People API (People carries contacts).
- Grant domain-wide delegation. In the Google Admin console → Security → API controls → Domain-wide delegation → Add new: paste the service account's Client ID and authorize all three scopes as one comma-separated line:
https://mail.google.com/,https://www.googleapis.com/auth/calendar,https://www.googleapis.com/auth/contacts
Part B — Set up the destination & run it
- Microsoft 365 destination. Use the Tenant/Client/secret from section 3, Part A (register the app if you haven't).
- Run it. New project → source Google Workspace (point it at the JSON key, delegation on) → destination Microsoft 365 (the trio) → map mailboxes (Autodiscover the M365 side, or import a CSV) → Verify → Pre-stage → Migrate.
6 · Microsoft 365 → Google Workspace
The reverse move — off Microsoft 365 onto Google Workspace. Source is the Graph app from section 3; destination is a Google service account like section 5, with one extra check.
Moves: mail · calendar · contacts
What you need
- On Microsoft 365 (source) — the Tenant ID, Client ID, secret Value from the app registration in section 3, Part A.
- On Google (destination) — a service account with JSON key + domain-wide delegation for the three scopes (section 5, Part A), and Gmail turned ON for the target users, or mail can't land.
Steps
- Set up the Microsoft 365 source. Register the Graph app (section 3, Part A) → tenant/client/secret trio.
- Set up the Google destination. Create the service account with domain-wide delegation and the JSON key (section 5, Part A). In the Google Admin console → Apps → Google Workspace → Gmail, make sure Gmail is ON for the users you're migrating to.
- Run it. New project → source Microsoft 365 (trio) → destination Google Workspace (JSON key) → map mailboxes → Verify → Pre-stage → Migrate.
7 · Trial mailboxes & troubleshooting
Why a run says "blocked: no license key"
Your free trial covers three real destination mailboxes — counted by distinct destination address, once each, the first time a message is written to them. Dry-run and Verify never count, so rehearse as much as you like. Once three different destinations have received mail, the fourth is blocked and the report prints the line below.
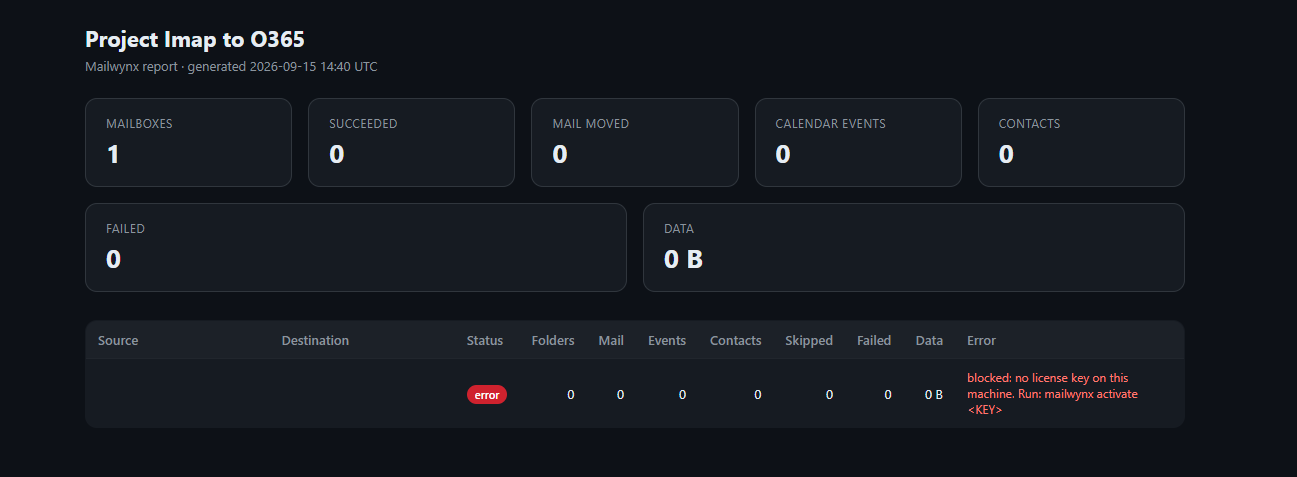
blocked: no license key and the exact command to fix it — activate a paid key, then re-run.> Mailwynx.exe activate MW-XXXXX-XXXXX-XXXXX-XXXXX ✓ License activated > Mailwynx.exe license # check what's active
Re-running after activating picks up exactly where the blocked run stopped — nothing already moved is copied twice.
Common issues
| Symptom | Likely cause & fix |
|---|---|
| Verify fails on the M365 side with an auth error | Admin consent wasn't granted, or you copied the secret's ID instead of its Value. Re-check the Azure app steps and regenerate the secret if needed. |
| M365 connects but can't see a mailbox | An Application Access Policy is scoping the app to a group that doesn't include that mailbox. Add it to the group, or remove the policy. |
| IMAP login rejected | 2FA is on and you're using the account password. Create an app password and use that as the secret. |
| Google source returns "unauthorized" | Domain-wide delegation isn't authorized for scope https://mail.google.com/, or the Gmail API isn't enabled on the project. |
Contacts phase fails with 403 ErrorAccessDenied (mail & calendar worked) | The Azure app is missing Contacts.ReadWrite. In API permissions, search "Contacts" (plural) and tick Contacts.ReadWrite — Read and write contacts in all mailboxes, then Grant admin consent. Note: OrgContact.Read.All is the wrong one — it reads the org directory, not mailbox contacts. |
| Google Admin shows "You haven't activated Gmail yet" | Gmail as a destination needs the service turned on: Admin console → Apps → Google Workspace → Gmail → set to ON for everyone (or the target OU). Mail can't land until it's active. |
| Can't download the Google service-account JSON key | An org policy blocks it — see the override steps in §5 · Google Workspace → Microsoft 365. |
| Frequent 429 / slow run | You're in Fast mode near the provider's limit. Lower requests_per_second or switch to Safe mode. |
| A run stopped partway | Nothing lost — just run again. It resumes from the last checkpoint and skips what's already moved. |
8 · Advanced: command line & automation
Most people never need this section. The web app does everything below with buttons. But if you script migrations or run them from a scheduled task or CI pipeline, Mailwynx is driven entirely from a plain-text config.yaml plus a few commands. It's the same engine underneath — nothing is different except the front door.
Install and run from a terminal
Instead of the double-click launcher, install once with Python and use the mailwynx command:
$ python -m venv .venv
$ source .venv/bin/activate      # Windows: .venv\Scripts\activate
$ pip install -e .
$ mailwynx web                  # same web app, started by hand
✓ Mailwynx running at http://127.0.0.1:8770
Run a whole migration without the browser
Three commands, always in this order — each is safe to repeat:
$ mailwynx verify config.yaml    # test creds + list folders (moves nothing)
$ mailwynx dry-run config.yaml   # count what WOULD move
$ mailwynx run config.yaml       # migrate — delta + resume on re-run
config.yaml reference
Generate a starter file with mailwynx init config.yaml, then edit it. A config has four blocks: project, throttle, the two endpoints (source / destination), and the mailboxes list.
| Block | Key | What it does |
|---|---|---|
project | workers | How many mailboxes migrate in parallel. 1 = Safe mode. |
batch_size | Messages fetched/written per batch (default 50). | |
db_path | Where the resume/checkpoint database lives. | |
dry_run | Count only, move nothing. | |
throttle | requests_per_second | Cap on API calls per second. |
max_retries | Retries on a throttled/failed call. | |
base_backoff / max_backoff | Exponential back-off bounds when a provider returns 429. | |
source /destination | type | imap, graph, or gmail. |
| (provider keys) | Host/port for IMAP; tenant/client/secret for Graph; JSON path for Gmail. | |
mailboxes | inline list or mailboxes_csv | Source→dest address pairs, inline or pointed at a CSV. |
# config.yaml — IMAP (Hostinger) → Microsoft 365
project:
  workers: 1            # Safe mode
  batch_size: 50
  dry_run: false
throttle:
  requests_per_second: 10
  max_retries: 5
source:
  type: imap
  host: imap.hostinger.com
  port: 993
  ssl: true
destination:
  type: graph
  tenant_id: 9f3b7c42-...-c21a
  client_id: 1a2b3c4d-...-5cef
  client_secret: <the secret VALUE>
mailboxes_csv: mailboxes.csv
Mailbox CSV format
For anything past a handful of users, list mailboxes in a CSV and reference it with mailboxes_csv. Leave the secret columns blank for Graph/Gmail (they use API auth); fill them with app passwords for IMAP. This is the same CSV you can import in the web app.
# mailboxes.csv
source,dest,source_secret,dest_secret,source_user,dest_user
anna@acme.com,anna@acme.com,app-pass-1,,,
raj@acme.com,raj@acme.com,app-pass-2,,,
sales@acme.com,sales@acme.com,app-pass-3,,,